96-07 YZF600R Frame Slider Instructions
WARNING: The installation of all parts in these installation instructions must be performed by a qualified motorcycle mechanic who is using the correct tools and who understands the correct use of all tools required to complete the installation.
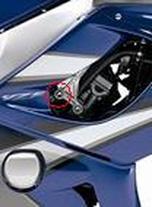
1. Start on the right side (viewed as sitting on the bike) of the bike (do not loosen both sides at once) by removing the upper engine mount screw, which is visible through the fairing cowl (figure A)
WARNING: THE WASHER MUST BE ON THE SCREW BEFORE INSTALLING THE SLIDERS
2. These sliders are side specific, so for the right side, install the slider with the aluminum spacer extending (about 0.5") from the base of the slider. Pay close attention to this because a slider installed on the wrong side will cause damage to the screw hole threads.
3. Using a torque wrench, tighten the screw to the factory torque specification (same as factory screw).
4. Make sure the right side is tight before starting on the left side.
5. For the left side, use the same procedure. The spacer of the left slider protrudes from the base of the slider only a small amount.
Mounting points for each side are basically the same- use the upper of the two engine mount screws.
If you damage one slider in a crash or drop, you can purchase just the side you need on this website, which includes the mounting screw.
For technical assistance, please contact us

