2009-2017 Yamaha FZ-6R Frame Sliders Installation
WARNING: The installation of all parts in these installation instructions must be performed by a qualified motorcycle mechanic who is using the correct tools and who understands the correct use of all tools required to complete the installation.
Tools Needed:
Torque wrench
8mm Allen/Hex Driver
3/8 Drive Ratchet
5mm Allen Wrench
1. Start on the left side (clutch lever side) by removing the screw from the rear area of the fairing. This screw is directly above the shifter linkage and is removed with a 5mm allen wrench. Removing the screw will allow the fairing to flex outward enough to access the frame slider mounting point. If you want to be a little more cautious, a few of the other fairing screws can be removed for a little extra room between the fairing and mounting point.
2. With the 8mm hex driver and 3/8 ratchet, remove the engine mount screw (fig. A) that is closest to the edge of the fairing. This screw is above the stator cover (the engine cover with YAMAHA written on it).
Special Notes:
- The left side uses the LONGER slider.
- The frame slider and bracket are shipped together but the slider needs to be removed from the bracket for the next step.
3. Using the supplied spacer beneath the bracket, install the bracket with the supplied mounting screw. The recess in the mounting hole of the bracket is to be facing outward.
4. Hand tighten the mounting screw.
5. Install the slider onto the bracket, hand tightening this screw as well. The bracket position can now be adjusted. The slider should be close to the fairing, but not touching the fairing. If the slider is touching the fairing, the bracket is adjusted incorrectly or the spacer was omitted and needs to be added in the proper position.
6. Once the desired bracket position is achieved, remove the slider, then tighten the screw which holds the bracket to the bike. Using a torque wrench, tighten the screw to the factory torque specification (same as factory screw).
7. For the slider-to-bracket screw, medium strength (blue) Loctite or other thread locking compound is required. Install the slider to the bracket and tighten. If using a torque wrench, tighten to 35 ft/lbs. WARNING: THE WASHERS MUST BE ON THE SCREW BEFORE INSTALLING THE SLIDERS
8. Re-install the screws for the fairing and tighten.
-The right side slider is the shortest of the two
9. Start by removing the screw from the rear area of the fairing. This screw is removed with a 5mm allen wrench. Removing the screw will allow the fairing to flex outward enough to access the frame slider mounting point. If you want to be a little more cautious, a few of the other fairing screws can be removed for a little extra room between the fairing and mounting point.
10. With the 8mm hex driver and 3/8 ratchet, remove the engine mount screw (fig. B) that is closest to the edge of the fairing.
Special Notes:
- The right side uses the shortest slider.
- The frame slider and bracket are shipped together but the slider needs to be removed from the bracket for the next step.
11. Install the bracket with the supplied mounting screw. The recess in the mounting hole of the bracket is to be facing outward. No spacer is used beneath the bracket on the right side.
12. Hand tighten the mounting screw.
13. Install the slider onto the bracket, hand tightening this screw as well. The bracket position can now be adjusted. The slider should not be touching the fairing. If the slider is touching the fairing, the bracket is adjusted incorrectly.
14. Once the desired bracket position is achieved, remove the slider and tighten the screw which holds the bracket to the bike to the factory torque specification (same as factory screw).
15. For the slider-to-bracket screw, medium strength (blue) Loctite or other thread locking compound is required. Install the slider to the bracket and tighten. If using a torque wrench, tighten to 35 ft/lbs.
16. Re-install the screws for the fairing and tighten.
- Do not use high alkaline based detergents to clean the frame sliders. The chemicals will discolor the anodized bracket and the slider as well.
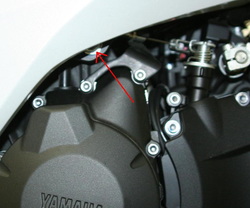
A
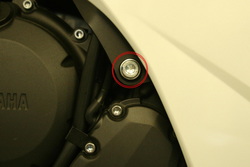
B