CB1000R Installation Instructions for:
Frame Sliders
Fork Sliders
WARNING: The installation of all parts in these installation instructions must be performed by a qualified motorcycle mechanic who is using the correct tools and who understands the correct use of all tools required to complete the installation.
Tools Needed:
Torque wrench
Ratchet
14mm Socket
8mm hex driver
5mm hex key
Frame Sliders
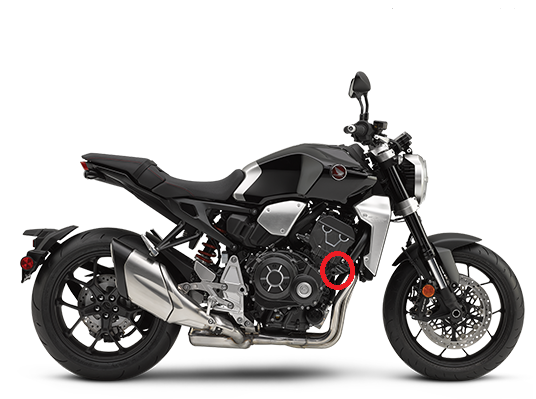
1. Start on the right side by loosening most of the way (do not fully remove) the engine mount screw circled in red with a 14mm socket and ratchet.
2. Put the supplied screw/washer into the right side frame slider (short). WARNING: THE WASHER MUST BE ON THE SCREW BEFORE INSTALLING THE SLIDERS
3. The spacer between the frame and the engine must not be removed- hold the spacer in place while removing the factory engine mount screw, then install the frame slider. The screw should go in by hand tightening,
4. Torque the screw to the factory specified amount (same as factory screw).
5. Repeat the same steps for the left side using the longest slider in the kit.
Fork Sliders
Tools needed:
5mm hex key x 2
Blue thread locker
This set installs with the front axle assembly in its factory configuration. No fasteners for the axle assembly should be removed or loosened.
1. Apply blue thread locker to the screw of the shorter fork slider and tighten to the rod. This is the slider that goes on the left side with the axle screw and will cover the axle screw when installed.
2. Insert the rod and slider through the left side of the axle.
3. Apply blue thread locker to the screw of the right fork slider and attach the slider to the right side.
4. Hold the left side slider with a 5mm hex key while tightening the right side.
5. Use light torque- too much torque can strip the threads of the rod or break the screw.
6. Make sure the assembly does not have any lateral movement.
7. Allow 1 hour for the thread locker to set up before riding the bike and check for movement in the assembly after the first ride and during regular maintenance and inspections.
For questions regarding installation, please contact us.
Frame Sliders
Fork Sliders
WARNING: The installation of all parts in these installation instructions must be performed by a qualified motorcycle mechanic who is using the correct tools and who understands the correct use of all tools required to complete the installation.
Tools Needed:
Torque wrench
Ratchet
14mm Socket
8mm hex driver
5mm hex key
Frame Sliders
1. Start on the right side by loosening most of the way (do not fully remove) the engine mount screw circled in red with a 14mm socket and ratchet.
2. Put the supplied screw/washer into the right side frame slider (short). WARNING: THE WASHER MUST BE ON THE SCREW BEFORE INSTALLING THE SLIDERS
3. The spacer between the frame and the engine must not be removed- hold the spacer in place while removing the factory engine mount screw, then install the frame slider. The screw should go in by hand tightening,
4. Torque the screw to the factory specified amount (same as factory screw).
5. Repeat the same steps for the left side using the longest slider in the kit.
Fork Sliders
Tools needed:
5mm hex key x 2
Blue thread locker
This set installs with the front axle assembly in its factory configuration. No fasteners for the axle assembly should be removed or loosened.
1. Apply blue thread locker to the screw of the shorter fork slider and tighten to the rod. This is the slider that goes on the left side with the axle screw and will cover the axle screw when installed.
2. Insert the rod and slider through the left side of the axle.
3. Apply blue thread locker to the screw of the right fork slider and attach the slider to the right side.
4. Hold the left side slider with a 5mm hex key while tightening the right side.
5. Use light torque- too much torque can strip the threads of the rod or break the screw.
6. Make sure the assembly does not have any lateral movement.
7. Allow 1 hour for the thread locker to set up before riding the bike and check for movement in the assembly after the first ride and during regular maintenance and inspections.
For questions regarding installation, please contact us.

