2011-2013 Aprilia Tuono Frame Sliders and Fork Sliders Installation Instructions
WARNING: The installation of all parts in these installation instructions must be performed by a qualified motorcycle mechanic who is using the correct tools and who understands the correct use of all tools required to complete the installation.
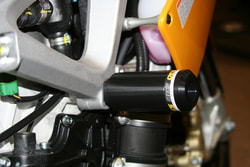
1. Start on the right side by removing the engine mount screw. Refer to the photo below for the designated frame
slider mounting point.
2. The supplied spacer goes in the recess in the frame where the engine mount screw was removed. Use our supplied screw to attach the slider over the spacer. WARNING: THE WASHER MUST BE ON THE SCREW BEFORE INSTALLING THE SLIDERS
3. Tighten the frame slider mounting screw using a torque wrench set at the factory torque specification (same as factory screw).
4. Use the same steps for the left side.
Please contact us with technical questions
10-13 Aprilia RSV4, 11-13 Tuono Fork Sliders Installation Instructions
Note: This set is installed with the front axle in its normal operating position.
1. Match the long screw with the long slider and the short screw with the short slider. Each screw needs a washer
on it.
2. Apply medium strength thread locker compound (available here) to the long mounting screw.
3. Install the long axle slider onto the supplied shaft and lightly tighten with a 5mm hex wrench.
4. Insert slider and shaft assembly into the axle from the side of the axle that will allow the slider base to recess
into the axle (the side without the nut).
5. Apply medium thread locker compound to the short screw and insert through the short slider. While holding the
opposing slider/shaft firmly in place by hand, insert the slider/screw into the axle and carefully start the screw into
the shaft. It may take some careful positioning of the shaft to get the threads started into the shaft.
6. Once the screw has been started and confirmed that proper thread engagement was made, lightly torque the
screw.
7. Final tighten the opposing screw with light torque.
Important: Do not over tighten the left or right side screw.
For technical assistance, please contact us.
