 A--------------------------B
Honda 919 Frame Slider Installation Instructions
WARNING: The installation of all parts in these installation instructions must be performed by a qualified motorcycle mechanic who is using the correct tools and who understands the correct use of all tools required to complete the installation.
Note: Please read instructions carefully. Sliders are side specific (different lengths) for this application.
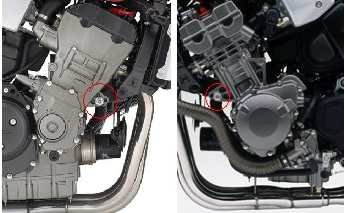
1) Locate the right side engine mount bolt (Illustration A)
2) Remove the engine mount bolt (14mm) while holding with a wrench the nut on the backside of bolt.
3) Add supplied washer(s) to the bolt. The washer(s) must be on the bolt before the next step.
4) Install supplied bolt through the SHORTEST frame slider and insert into engine mount bolt hole. Install the nut on the bolt and hold with a wrench. Tighten to the factory torque specification (same as factory bolt).
5) Locate the left side engine mount bolt (See illustration B)
6) Remove the engine mount through bolt while holding with a wrench the nut on the backside of bolt.
7) Add supplied washer(s) to the bolt. The washer(s) must be on the bolt before the next step.
8) Install supplied bolt through the LONGEST frame slider and insert into engine mount bolt hole. Install the nut on the bolt and
hold with a wrench.
Tighten to the factory torque specification (same as factory bolt).
For technical assistance, please contact us