2002-2003 Yamaha R1 Installation Instructions for:
- Frame Sliders
- Swingarm Spools
WARNING: The installation of all parts in these installation instructions must be performed by a qualified motorcycle mechanic who is using the correct tools and who understands the correct use of all tools required to complete the installation.
Frame Sliders
Warning! Warning! Read this first part very carefully. If you do not understand it or your mechanic does not understand it, you must contact us before proceeding.
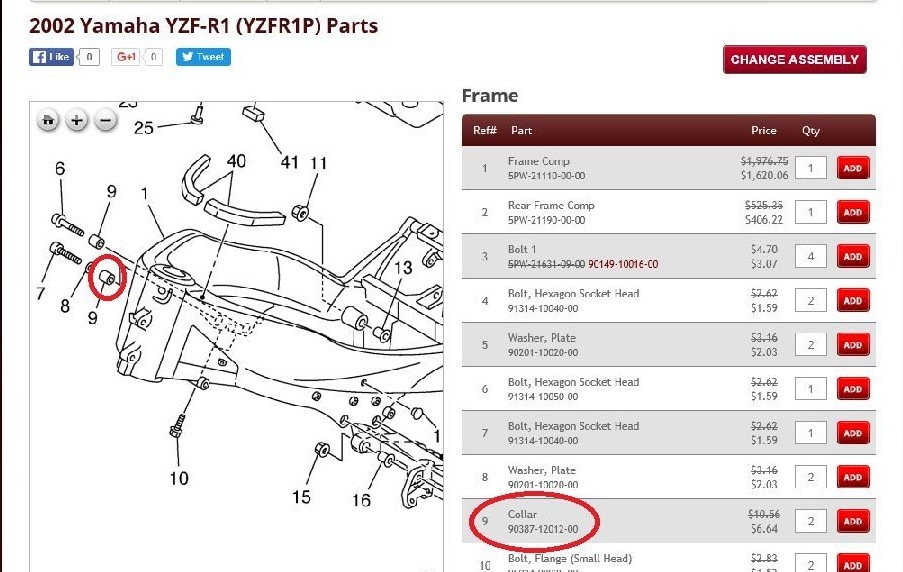
The right side engine mount that is to be used for the frame slider mounting point uses a spacer that is tightened to the cylinder head from the factory. The frame has a pinch bolt that is used to secure the engine to the frame at this mounting point. This spacer MUST REMAIN in its factory position and the frame pinch bolt MUST REMAIN tightened.
There are some poorly designed frame sliders on the market that omit the spacer and use the frame slider as the spacer. In some cases, a previous set of frame sliders may have been mounted without the spacer, but without the spacer you have one less engine mount. If your bike has had frame sliders previously that omitted the spacer, you must either buy a spacer from us or your local Yamaha dealer. The spacer is circled in red in the diagram below (figure A) and is also referred to as a collar (item #9).
1. Start on the right side. Work on only one side at a time. Remove the engine mount screw visible in the cowl opening in the fairing. Do not remove or loosen any other screw.
The right side uses the short frame slider and short mounting screw.
WARNING: THE WASHER MUST BE ON THE SCREW BEFORE INSTALLING THE SLIDERS
2. Insert the screw through the frame slider and thread the screw into the engine mount point. The screw should thread in by hand with little force.
3. Tighten to factory specifications.
4. The left side mounting point is also visible through the left side cowl opening. Remove the factory engine mount screw.
The left side uses the long frame slider and the long screw supplied with the slider.
5. Insert the screw through the frame slider and thread the screw into the engine mount point. The screw should thread in by hand with little force.
6. Using a torque wrench, tighten to factory specifications (same as factory screw).
Swingarm Spools
Each swingarm mounting screw should be lightly coated with blue Loctite and tightened with a small amount of torque.

